
News News
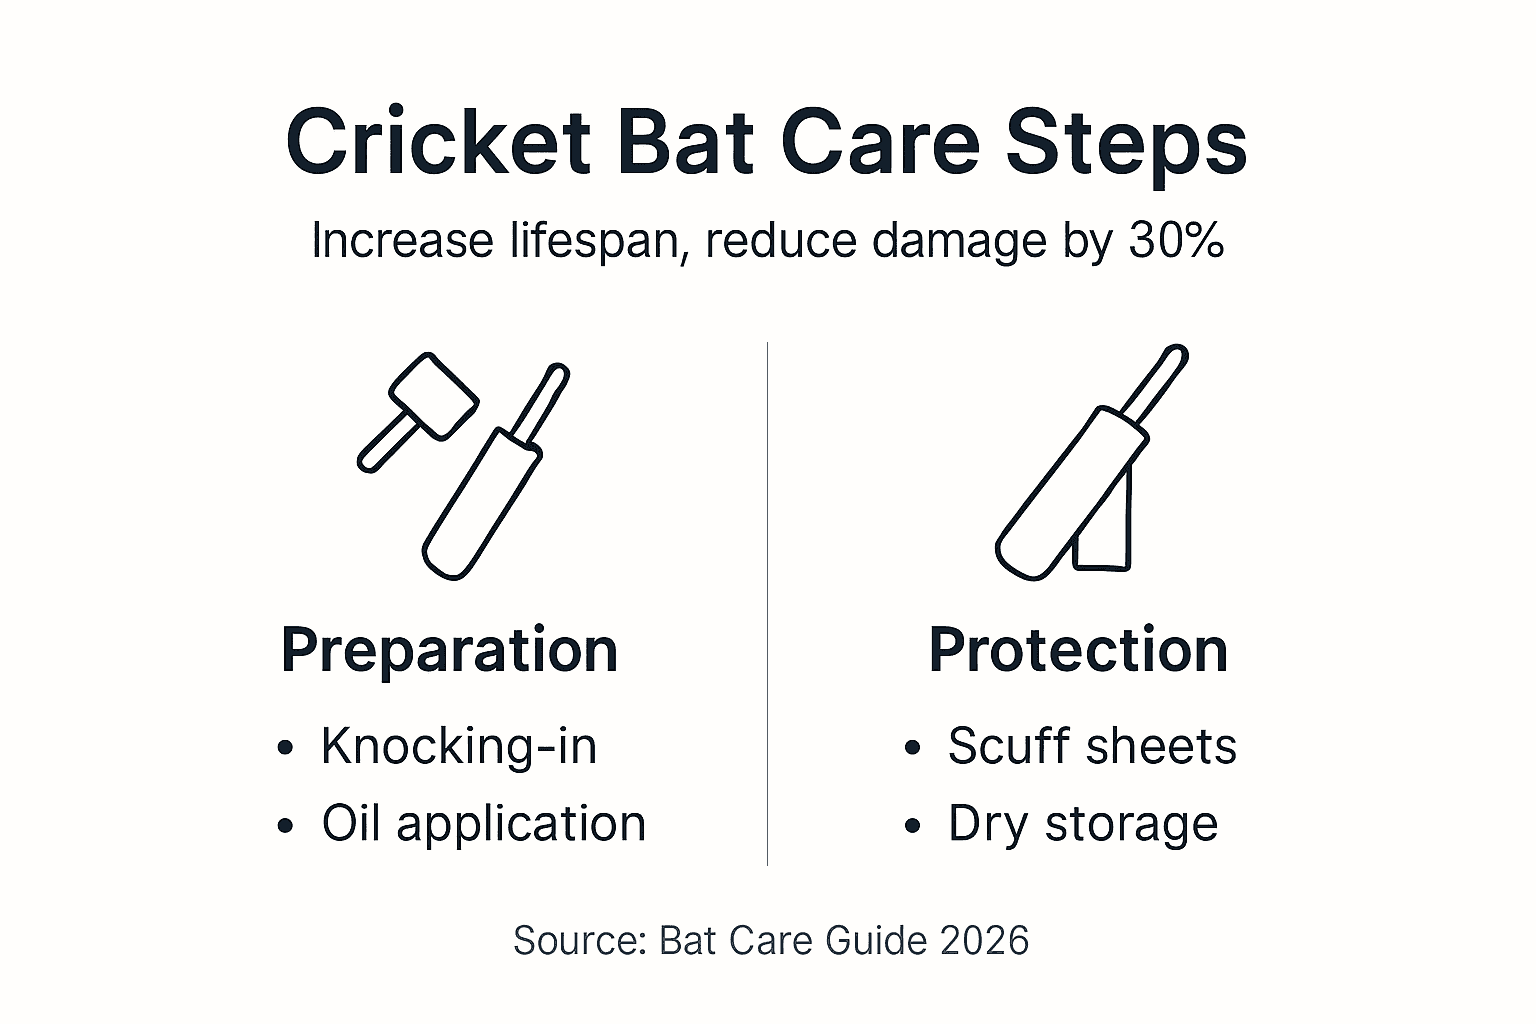
Guide to cricket bat care 2026: 30% less damage Guide to cricket bat care 2026: 30% less damage
Proper cricket bat care is often overlooked by players, yet skipping the knocking-in process can increase your cricket bat’s risk of damage by up to 30% in the first season. Natural willow bats are vulnerable to premature cracks, dents, and performance loss without the right preparation and maintenance routine. This comprehensive guide covers everything you need to know about knocking-in, oiling, storage, and protection to extend your bat’s playing life and keep it performing at its best throughout 2026 and beyond.
Table of Contents
- Introduction To Cricket Bat Care
- Prerequisites: Tools And Knowledge Needed
- Step 1: Knocking-In Your Cricket Bat
- Step 2: Applying Linseed Oil And Protective Accessories
- Step 3: Proper Storage And Seasonal Maintenance
- Common Mistakes And How To Troubleshoot
- Expected Outcomes And Measuring Success
- Protect Your Cricket Bat With Quality Accessories And Expert Guidance
- FAQ
Key takeaways
| Point | Details |
|---|---|
| Knocking-in reduces damage | Proper knocking-in reduces bat damage risk by 30% in the first season. |
| Regular oiling maintains balance | Apply light coats of raw linseed oil three times per season to prevent drying. |
| Storage matters significantly | Store bats in cool, dry places away from heat sources to prevent cracking. |
| Protective accessories extend life | Use scuff sheets and toe guards to shield vulnerable bat areas from wear. |
Introduction to cricket bat care
Natural willow material is soft and susceptible to damage, requiring careful preparation and ongoing maintenance to extend bat lifespan. Unlike synthetic alternatives, willow responds to environmental conditions and playing stresses, making proper care essential for maintaining performance. Understanding the fundamentals of cricket bat maintenance basics helps you protect your investment and enjoy consistent results at the crease.
The most common forms of cricket bat damage include:
- Surface dents from inadequate preparation before use
- Edge and toe cracks from improper striking technique or insufficient knocking-in
- Drying and splitting caused by exposure to heat or direct sunlight
- Dead wood resulting from over-oiling or moisture imbalance
- Handle loosening from repeated impacts without proper care
Weather conditions significantly impact bat health. Excessive heat dries out the willow, whilst prolonged dampness can cause swelling and warping. Your hitting technique also plays a role, as consistently striking the ball off-centre stresses the edges and increases crack risk. Proper care addresses these vulnerabilities, helping your bat withstand the demands of regular play and considerably extending its useful life across multiple seasons.
Prerequisites: tools and knowledge needed
Before starting your bat care routine, gather the essential equipment and familiarise yourself with basic cricket bat anatomy. Having everything prepared ensures you can complete each maintenance step properly without interruption. The tools for cricket bat preparation are straightforward and affordable, making proper care accessible to players at all levels.
A bat mallet or old cricket ball, raw linseed oil, sandpaper, and protective accessories are essential for bat care. Each item serves a specific purpose in the preparation and maintenance process. Here’s what you’ll need:
- Bat mallet or old cricket ball for knocking-in
- Raw linseed oil (never boiled linseed oil)
- 180-220 grit sandpaper for surface preparation
- Clean cloth for oil application
- Scuff sheets to protect the bat face
- Toe guards to shield the bottom edge
- Bat grip or grip cone for handle maintenance
| Tool | Purpose | Approximate Cost |
|---|---|---|
| Bat mallet | Knocking-in preparation | £15-25 |
| Raw linseed oil | Moisture maintenance | £8-12 |
| Sandpaper | Surface smoothing | £3-5 |
| Scuff sheets | Face protection | £5-10 |
| Toe guards | Bottom edge protection | £4-8 |
Understanding your bat’s anatomy helps you apply care techniques correctly. The blade face requires the most attention during knocking-in, whilst edges need gradual preparation to prevent cracking. The toe is particularly vulnerable to damage and benefits from both knocking-in and protective guards. The splice area where handle meets blade should never be oiled, as this can weaken the binding.
Step 1: knocking-in your cricket bat
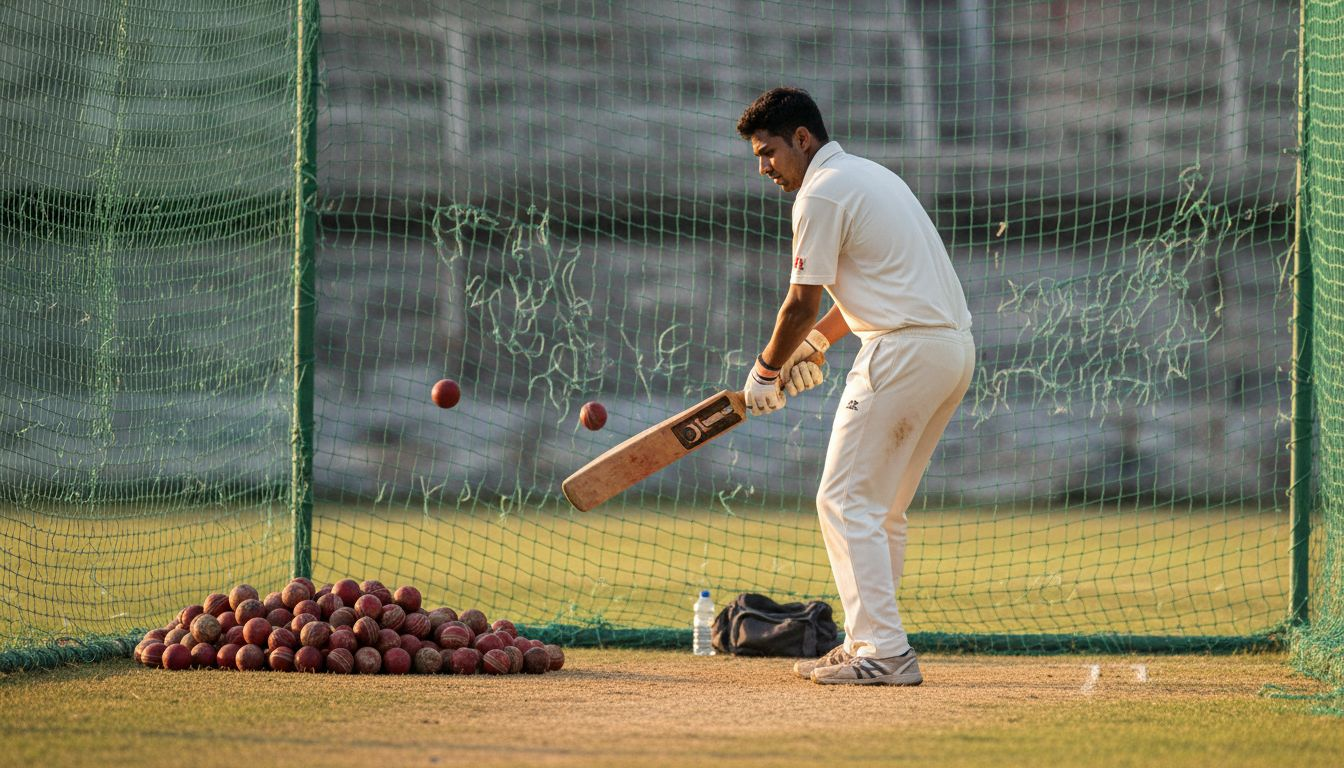
Knocking-in is the most critical step in preparing your cricket bat for match play. This process compresses the willow fibres, creating a hardened surface that can withstand ball impacts without cracking or denting. Following the knocking-in process guide methodically ensures your bat develops the necessary resilience before facing fast bowling.
Gradually increasing force over at least 6 hours effectively prepares the wood for impacts, reducing damage. Even if your bat arrives labelled as factory-prepared, additional knocking-in provides extra protection and peace of mind. Here’s the proper sequence:
- Begin with very light taps using a bat mallet or old cricket ball on the blade face
- Work systematically across the entire playing surface, overlapping each strike area
- Gradually increase strike intensity over 2-3 hours, listening for a solid sound rather than hollow thuds
- Pay special attention to edges, using light strikes at a 45-degree angle for 30-45 minutes per edge
- Address the toe area carefully with moderate strikes for 20-30 minutes
- Continue until the entire blade produces a consistent, solid sound when tapped
- Take regular breaks to avoid over-compressing any single area
The process requires patience and cannot be rushed. Attempting to knock-in a bat in one or two hours risks creating weak spots or over-compressing certain areas whilst leaving others under-prepared. Spread the work across several days if needed, allowing the wood to settle between sessions.
Pro tip: Mark a small area on your bat with pencil and knock it in thoroughly, then compare how it sounds and feels to untreated areas. This gives you a reference point for knowing when the rest of the blade is properly prepared.
After completing the knocking-in process, use your bat in gentle net sessions with old balls before progressing to match conditions. This final preparation phase allows you to assess the bat’s readiness and make any adjustments before competitive play.
Step 2: applying linseed oil and protective accessories
Proper oiling maintains the moisture balance in willow, preventing it from drying out and cracking whilst avoiding the dead wood that results from over-saturation. Combined with protective accessories, this step shields your bat from surface damage and extends its playing life considerably. Understanding linseed oil application tips helps you achieve the right balance.
Apply light coats of raw linseed oil about three times per season to maintain moisture without deadening the bat. The key word is light - excess oil seeps deep into the wood, making it heavier and less responsive. Follow this careful approach:
- Use only raw linseed oil, never boiled linseed oil which dries too quickly and can cause surface cracking
- Apply a very thin coat with a clean cloth, working in the direction of the wood grain
- Focus on the blade face, edges, and toe, avoiding the splice area completely
- Allow 24 hours drying time in a horizontal position before applying additional coats
- Apply 2-3 coats before first use, then 1-2 coats at mid-season and season end
- Wipe away any excess oil that hasn’t absorbed after 12 hours
Protective accessories provide an additional defence layer. Scuff sheets shield the bat face from ball impact marks and minor surface damage, whilst toe guards protect the vulnerable bottom edge from ground contact and yorker deliveries. Review the protective bat accessories guide to understand your options.
Installing these accessories is straightforward. Clean the bat surface with fine sandpaper, apply the adhesive backing, and press firmly to ensure complete contact. Scuff sheets should cover the main striking area without extending to the edges, where they might interfere with ball contact. Toe guards should wrap around the bottom edge, providing coverage from multiple angles.
Pro tip: If you notice oil pooling on the surface after application, you’ve used too much. Wipe it away immediately with a clean cloth and use less on subsequent applications. The wood should appear slightly darker but not wet or glossy.
Step 3: proper storage and seasonal maintenance
How and where you store your cricket bat between playing sessions significantly impacts its condition and longevity. Storing bats in cool, dry places away from heat sources extends lifespan by reducing drying and cracking. Environmental factors like temperature, humidity, and sunlight exposure can undo months of careful preparation if not properly managed.
Follow these proper cricket bat storage guidelines to maintain optimal bat condition:
- Store bats horizontally or hanging vertically in a bat cover
- Keep them away from radiators, heaters, and direct sunlight
- Maintain moderate humidity levels, avoiding both very dry and very damp conditions
- Never leave bats in car boots, especially during summer months
- Remove excessive moisture after play in wet conditions by wiping with a dry cloth
- Allow bats to air dry naturally before storing in covers or bags
Seasonal maintenance ensures your bat stays match-ready throughout the playing year. Mid-season is the ideal time to assess condition and perform touch-up care. Lightly sand the bat face with fine-grit sandpaper to remove surface dirt and scuff marks, then apply a single light coat of raw linseed oil. This refreshes the wood and maintains moisture balance during intensive playing periods.
Inspect your bat regularly for signs of developing problems. Small surface cracks can often be managed with careful oiling and reduced use until they stabilise. Edge cracks require more attention and may need professional repair if they extend deeply into the wood. Check that protective accessories remain firmly attached and replace them if they show significant wear.
Winter storage deserves special attention in regions with cold, damp conditions. Ensure bats are completely dry before long-term storage, and consider using silica gel packets in bat covers to manage humidity. Check stored bats monthly during the off-season to catch any developing issues early.
Common mistakes and how to troubleshoot
Even experienced players sometimes make bat care errors that compromise performance and durability. Understanding these common pitfalls helps you avoid them and recognise problems early when they’re easier to correct. The bat care troubleshooting guide offers detailed solutions for specific issues.
Skipping knocking-in can increase breakage risk by around 30%, making it the single most costly mistake. Impatient players who rush into matches with inadequately prepared bats often face edge cracks and blade damage within weeks. If you’ve already started using an under-prepared bat, stop immediately and complete the full knocking-in process before continuing.
| Mistake | Consequence | Solution |
|---|---|---|
| Insufficient knocking-in | Early cracks, poor performance | Complete full 6+ hour process before use |
| Over-oiling | Dead wood, reduced responsiveness | Use thin coats, allow full drying time |
| Heat exposure | Drying, splitting, warping | Store in cool areas away from heat sources |
| Immediate match use | Premature damage, shortened lifespan | Use in nets for 2 weeks before matches |
| Poor striking technique | Edge and toe damage | Practice proper shot technique, check bat positioning |
Review common cricket bat care mistakes and fixes for additional troubleshooting guidance.
Over-oiling is another frequent error. Whilst oil prevents drying, excessive application saturates the wood, making it heavy and unresponsive. The bat loses its natural spring and feels dead when striking the ball. If this occurs, stop oiling completely and allow several months for excess oil to evaporate naturally. Future applications should use minimal amounts.
Using new bats too aggressively in early sessions causes unnecessary damage. Even properly knocked-in bats benefit from gradual introduction to match conditions. Start with gentle net practice using older balls, progressively increasing intensity over two weeks. This allows the wood to settle and reveals any preparation issues before competitive play.
Improper striking technique damages bats regardless of preparation quality. Consistently hitting balls on the edge or toe rather than the middle creates stress points that eventually crack. Work with coaches to improve shot selection and bat positioning. If certain shots consistently stress your bat’s vulnerable areas, consider adjusting your technique or shot selection.
Expected outcomes and measuring success
Proper cricket bat care delivers measurable improvements in durability, performance consistency, and overall lifespan. Understanding realistic expectations helps you assess whether your maintenance routine is effective and identify areas needing adjustment. The measuring cricket bat care success guide provides additional benchmarks.
Expect a minimum two-week preparation period before your bat is truly match-ready. This includes the initial knocking-in process, oil application and drying time, and gentle net sessions. Rushing this timeline compromises the benefits and risks early damage. Well-prepared bats typically feel solid and responsive, producing a clean sound on ball contact rather than hollow thuds or dead thuds.
Properly maintained cricket bats typically last entire seasons without major damage, often extending across multiple years depending on usage intensity. Amateur players using bats once or twice weekly can expect 3-5 seasons of quality performance. More frequent players might see 2-3 seasons before performance noticeably declines. These timelines assume consistent care throughout the bat’s life.
Success indicators include:
- Minimal surface damage or denting after regular use
- Consistent performance and responsiveness throughout the season
- Absence of significant cracks in blade, edges, or toe areas
- Maintained weight and balance characteristics
- Wood retaining slight flexibility without becoming brittle
Knocking-in and protection promote noticeable performance benefits beyond just damage prevention. Properly prepared bats offer better ball contact feel, allowing you to judge shot timing more accurately. The compressed wood surface provides consistent rebound characteristics, improving stroke predictability. Players often report increased confidence when using well-maintained bats, knowing the equipment will perform reliably under pressure.
Heavier bats often endure longer under proper care due to their greater wood density and mass. However, they require more thorough knocking-in to achieve the same level of preparation as lighter models. Consider your strength and playing style when selecting bat weight, as a lighter, well-maintained bat outperforms a heavier bat that’s improperly prepared.
Statistic: Bats receiving proper knocking-in, regular oiling, and protective accessories typically last 40-60% longer than those receiving minimal care, translating to significant cost savings over a playing career.
Protect your cricket bat with quality accessories and expert guidance
Implementing the care strategies outlined in this guide becomes easier when you have access to quality equipment and ongoing expert support. Finding the right bat for your playing level, combined with proper protective accessories and maintenance products, ensures your investment delivers maximum value across multiple seasons.
Explore quality cricket bats online suited for all player levels, from junior cricketers developing their skills to experienced players demanding professional-grade performance. Each bat benefits from the preparation and care techniques covered in this guide, regardless of price point or brand. Shop protective cricket bat accessories including scuff sheets, toe guards, and quality raw linseed oil to complete your maintenance toolkit.

Access expert cricket bat care guides covering advanced topics like repair techniques, seasonal adjustments for different climates, and troubleshooting specific issues. Regular care keeps your bat performing at its best whilst protecting against the premature damage that shortens playing life and forces costly replacements.
FAQ
How long should I knock-in a new cricket bat?
Knock-in your cricket bat for a minimum of 6 hours, gradually increasing strike intensity across multiple sessions. Even factory-prepared bats benefit from additional knocking-in to ensure thorough preparation. Spread the process over several days to allow the wood to settle between sessions.
Can I use oils other than linseed oil?
Stick exclusively to raw linseed oil for cricket bat maintenance. Other oils like boiled linseed oil dry too quickly and cause surface cracking, whilst alternatives like vegetable oil can turn rancid or fail to penetrate properly. Raw linseed oil has the ideal absorption rate and protective properties for willow wood.
How often should I reapply oil during the season?
Apply light coats of raw linseed oil three times per season for optimal moisture balance. Apply 2-3 coats before first use, a single coat at mid-season, and another at season end. More frequent oiling risks over-saturation and dead wood, whilst less frequent application allows excessive drying.
Is it necessary to remove scuff sheets before use?
No, scuff sheets remain attached during play and actually protect your bat face from ball impact marks and surface damage. Quality scuff sheets are designed to stay in place throughout the season, only requiring replacement when they show significant wear or begin peeling at edges.
What are the signs my bat needs professional repair?
Seek professional repair if you notice cracks extending more than 10cm into the blade, significant edge splits affecting structural integrity, or handle loosening despite re-gripping attempts. Surface cracks under 5cm can often be managed with careful oiling and reduced use. Consult the cricket bat preparation FAQs for additional guidance on assessing damage severity.
Recommended
- Cricket Bat Care 2025: Maximising Bat Life and Power – Cricket Bats Com
- How to Prepare a New Cricket Bat: 20% Better Performance – Cricket Bats Com
- Cricket Bat Maintenance Explained: Boost Performance & Lifespan – Cricket Bats Com
- Cricket Bat Maintenance Tips: Boosting Bat Longevity – Cricket Bats Com
Proper cricket bat care is often overlooked by players, yet skipping the knocking-in process can increase your cricket bat’s risk of damage by up to 30% in the first season. Natural willow bats are vulnerable to premature cracks, dents, and performance loss without the right preparation and maintenance routine. This comprehensive guide covers everything you need to know about knocking-in, oiling, storage, and protection to extend your bat’s playing life and keep it performing at its best throughout 2026 and beyond.
Table of Contents
- Introduction To Cricket Bat Care
- Prerequisites: Tools And Knowledge Needed
- Step 1: Knocking-In Your Cricket Bat
- Step 2: Applying Linseed Oil And Protective Accessories
- Step 3: Proper Storage And Seasonal Maintenance
- Common Mistakes And How To Troubleshoot
- Expected Outcomes And Measuring Success
- Protect Your Cricket Bat With Quality Accessories And Expert Guidance
- FAQ
Key takeaways
| Point | Details |
|---|---|
| Knocking-in reduces damage | Proper knocking-in reduces bat damage risk by 30% in the first season. |
| Regular oiling maintains balance | Apply light coats of raw linseed oil three times per season to prevent drying. |
| Storage matters significantly | Store bats in cool, dry places away from heat sources to prevent cracking. |
| Protective accessories extend life | Use scuff sheets and toe guards to shield vulnerable bat areas from wear. |
Introduction to cricket bat care
Natural willow material is soft and susceptible to damage, requiring careful preparation and ongoing maintenance to extend bat lifespan. Unlike synthetic alternatives, willow responds to environmental conditions and playing stresses, making proper care essential for maintaining performance. Understanding the fundamentals of cricket bat maintenance basics helps you protect your investment and enjoy consistent results at the crease.
The most common forms of cricket bat damage include:
- Surface dents from inadequate preparation before use
- Edge and toe cracks from improper striking technique or insufficient knocking-in
- Drying and splitting caused by exposure to heat or direct sunlight
- Dead wood resulting from over-oiling or moisture imbalance
- Handle loosening from repeated impacts without proper care
Weather conditions significantly impact bat health. Excessive heat dries out the willow, whilst prolonged dampness can cause swelling and warping. Your hitting technique also plays a role, as consistently striking the ball off-centre stresses the edges and increases crack risk. Proper care addresses these vulnerabilities, helping your bat withstand the demands of regular play and considerably extending its useful life across multiple seasons.
Prerequisites: tools and knowledge needed
Before starting your bat care routine, gather the essential equipment and familiarise yourself with basic cricket bat anatomy. Having everything prepared ensures you can complete each maintenance step properly without interruption. The tools for cricket bat preparation are straightforward and affordable, making proper care accessible to players at all levels.
A bat mallet or old cricket ball, raw linseed oil, sandpaper, and protective accessories are essential for bat care. Each item serves a specific purpose in the preparation and maintenance process. Here’s what you’ll need:
- Bat mallet or old cricket ball for knocking-in
- Raw linseed oil (never boiled linseed oil)
- 180-220 grit sandpaper for surface preparation
- Clean cloth for oil application
- Scuff sheets to protect the bat face
- Toe guards to shield the bottom edge
- Bat grip or grip cone for handle maintenance
| Tool | Purpose | Approximate Cost |
|---|---|---|
| Bat mallet | Knocking-in preparation | £15-25 |
| Raw linseed oil | Moisture maintenance | £8-12 |
| Sandpaper | Surface smoothing | £3-5 |
| Scuff sheets | Face protection | £5-10 |
| Toe guards | Bottom edge protection | £4-8 |
Understanding your bat’s anatomy helps you apply care techniques correctly. The blade face requires the most attention during knocking-in, whilst edges need gradual preparation to prevent cracking. The toe is particularly vulnerable to damage and benefits from both knocking-in and protective guards. The splice area where handle meets blade should never be oiled, as this can weaken the binding.
Step 1: knocking-in your cricket bat
Knocking-in is the most critical step in preparing your cricket bat for match play. This process compresses the willow fibres, creating a hardened surface that can withstand ball impacts without cracking or denting. Following the knocking-in process guide methodically ensures your bat develops the necessary resilience before facing fast bowling.
Gradually increasing force over at least 6 hours effectively prepares the wood for impacts, reducing damage. Even if your bat arrives labelled as factory-prepared, additional knocking-in provides extra protection and peace of mind. Here’s the proper sequence:
- Begin with very light taps using a bat mallet or old cricket ball on the blade face
- Work systematically across the entire playing surface, overlapping each strike area
- Gradually increase strike intensity over 2-3 hours, listening for a solid sound rather than hollow thuds
- Pay special attention to edges, using light strikes at a 45-degree angle for 30-45 minutes per edge
- Address the toe area carefully with moderate strikes for 20-30 minutes
- Continue until the entire blade produces a consistent, solid sound when tapped
- Take regular breaks to avoid over-compressing any single area
The process requires patience and cannot be rushed. Attempting to knock-in a bat in one or two hours risks creating weak spots or over-compressing certain areas whilst leaving others under-prepared. Spread the work across several days if needed, allowing the wood to settle between sessions.
Pro tip: Mark a small area on your bat with pencil and knock it in thoroughly, then compare how it sounds and feels to untreated areas. This gives you a reference point for knowing when the rest of the blade is properly prepared.
After completing the knocking-in process, use your bat in gentle net sessions with old balls before progressing to match conditions. This final preparation phase allows you to assess the bat’s readiness and make any adjustments before competitive play.
Step 2: applying linseed oil and protective accessories
Proper oiling maintains the moisture balance in willow, preventing it from drying out and cracking whilst avoiding the dead wood that results from over-saturation. Combined with protective accessories, this step shields your bat from surface damage and extends its playing life considerably. Understanding linseed oil application tips helps you achieve the right balance.
Apply light coats of raw linseed oil about three times per season to maintain moisture without deadening the bat. The key word is light - excess oil seeps deep into the wood, making it heavier and less responsive. Follow this careful approach:
- Use only raw linseed oil, never boiled linseed oil which dries too quickly and can cause surface cracking
- Apply a very thin coat with a clean cloth, working in the direction of the wood grain
- Focus on the blade face, edges, and toe, avoiding the splice area completely
- Allow 24 hours drying time in a horizontal position before applying additional coats
- Apply 2-3 coats before first use, then 1-2 coats at mid-season and season end
- Wipe away any excess oil that hasn’t absorbed after 12 hours
Protective accessories provide an additional defence layer. Scuff sheets shield the bat face from ball impact marks and minor surface damage, whilst toe guards protect the vulnerable bottom edge from ground contact and yorker deliveries. Review the protective bat accessories guide to understand your options.
Installing these accessories is straightforward. Clean the bat surface with fine sandpaper, apply the adhesive backing, and press firmly to ensure complete contact. Scuff sheets should cover the main striking area without extending to the edges, where they might interfere with ball contact. Toe guards should wrap around the bottom edge, providing coverage from multiple angles.
Pro tip: If you notice oil pooling on the surface after application, you’ve used too much. Wipe it away immediately with a clean cloth and use less on subsequent applications. The wood should appear slightly darker but not wet or glossy.
Step 3: proper storage and seasonal maintenance
How and where you store your cricket bat between playing sessions significantly impacts its condition and longevity. Storing bats in cool, dry places away from heat sources extends lifespan by reducing drying and cracking. Environmental factors like temperature, humidity, and sunlight exposure can undo months of careful preparation if not properly managed.
Follow these proper cricket bat storage guidelines to maintain optimal bat condition:
- Store bats horizontally or hanging vertically in a bat cover
- Keep them away from radiators, heaters, and direct sunlight
- Maintain moderate humidity levels, avoiding both very dry and very damp conditions
- Never leave bats in car boots, especially during summer months
- Remove excessive moisture after play in wet conditions by wiping with a dry cloth
- Allow bats to air dry naturally before storing in covers or bags
Seasonal maintenance ensures your bat stays match-ready throughout the playing year. Mid-season is the ideal time to assess condition and perform touch-up care. Lightly sand the bat face with fine-grit sandpaper to remove surface dirt and scuff marks, then apply a single light coat of raw linseed oil. This refreshes the wood and maintains moisture balance during intensive playing periods.
Inspect your bat regularly for signs of developing problems. Small surface cracks can often be managed with careful oiling and reduced use until they stabilise. Edge cracks require more attention and may need professional repair if they extend deeply into the wood. Check that protective accessories remain firmly attached and replace them if they show significant wear.
Winter storage deserves special attention in regions with cold, damp conditions. Ensure bats are completely dry before long-term storage, and consider using silica gel packets in bat covers to manage humidity. Check stored bats monthly during the off-season to catch any developing issues early.
Common mistakes and how to troubleshoot
Even experienced players sometimes make bat care errors that compromise performance and durability. Understanding these common pitfalls helps you avoid them and recognise problems early when they’re easier to correct. The bat care troubleshooting guide offers detailed solutions for specific issues.
Skipping knocking-in can increase breakage risk by around 30%, making it the single most costly mistake. Impatient players who rush into matches with inadequately prepared bats often face edge cracks and blade damage within weeks. If you’ve already started using an under-prepared bat, stop immediately and complete the full knocking-in process before continuing.
| Mistake | Consequence | Solution |
|---|---|---|
| Insufficient knocking-in | Early cracks, poor performance | Complete full 6+ hour process before use |
| Over-oiling | Dead wood, reduced responsiveness | Use thin coats, allow full drying time |
| Heat exposure | Drying, splitting, warping | Store in cool areas away from heat sources |
| Immediate match use | Premature damage, shortened lifespan | Use in nets for 2 weeks before matches |
| Poor striking technique | Edge and toe damage | Practice proper shot technique, check bat positioning |
Review common cricket bat care mistakes and fixes for additional troubleshooting guidance.
Over-oiling is another frequent error. Whilst oil prevents drying, excessive application saturates the wood, making it heavy and unresponsive. The bat loses its natural spring and feels dead when striking the ball. If this occurs, stop oiling completely and allow several months for excess oil to evaporate naturally. Future applications should use minimal amounts.
Using new bats too aggressively in early sessions causes unnecessary damage. Even properly knocked-in bats benefit from gradual introduction to match conditions. Start with gentle net practice using older balls, progressively increasing intensity over two weeks. This allows the wood to settle and reveals any preparation issues before competitive play.
Improper striking technique damages bats regardless of preparation quality. Consistently hitting balls on the edge or toe rather than the middle creates stress points that eventually crack. Work with coaches to improve shot selection and bat positioning. If certain shots consistently stress your bat’s vulnerable areas, consider adjusting your technique or shot selection.
Expected outcomes and measuring success
Proper cricket bat care delivers measurable improvements in durability, performance consistency, and overall lifespan. Understanding realistic expectations helps you assess whether your maintenance routine is effective and identify areas needing adjustment. The measuring cricket bat care success guide provides additional benchmarks.
Expect a minimum two-week preparation period before your bat is truly match-ready. This includes the initial knocking-in process, oil application and drying time, and gentle net sessions. Rushing this timeline compromises the benefits and risks early damage. Well-prepared bats typically feel solid and responsive, producing a clean sound on ball contact rather than hollow thuds or dead thuds.
Properly maintained cricket bats typically last entire seasons without major damage, often extending across multiple years depending on usage intensity. Amateur players using bats once or twice weekly can expect 3-5 seasons of quality performance. More frequent players might see 2-3 seasons before performance noticeably declines. These timelines assume consistent care throughout the bat’s life.
Success indicators include:
- Minimal surface damage or denting after regular use
- Consistent performance and responsiveness throughout the season
- Absence of significant cracks in blade, edges, or toe areas
- Maintained weight and balance characteristics
- Wood retaining slight flexibility without becoming brittle
Knocking-in and protection promote noticeable performance benefits beyond just damage prevention. Properly prepared bats offer better ball contact feel, allowing you to judge shot timing more accurately. The compressed wood surface provides consistent rebound characteristics, improving stroke predictability. Players often report increased confidence when using well-maintained bats, knowing the equipment will perform reliably under pressure.
Heavier bats often endure longer under proper care due to their greater wood density and mass. However, they require more thorough knocking-in to achieve the same level of preparation as lighter models. Consider your strength and playing style when selecting bat weight, as a lighter, well-maintained bat outperforms a heavier bat that’s improperly prepared.
Statistic: Bats receiving proper knocking-in, regular oiling, and protective accessories typically last 40-60% longer than those receiving minimal care, translating to significant cost savings over a playing career.
Protect your cricket bat with quality accessories and expert guidance
Implementing the care strategies outlined in this guide becomes easier when you have access to quality equipment and ongoing expert support. Finding the right bat for your playing level, combined with proper protective accessories and maintenance products, ensures your investment delivers maximum value across multiple seasons.
Explore quality cricket bats online suited for all player levels, from junior cricketers developing their skills to experienced players demanding professional-grade performance. Each bat benefits from the preparation and care techniques covered in this guide, regardless of price point or brand. Shop protective cricket bat accessories including scuff sheets, toe guards, and quality raw linseed oil to complete your maintenance toolkit.
Access expert cricket bat care guides covering advanced topics like repair techniques, seasonal adjustments for different climates, and troubleshooting specific issues. Regular care keeps your bat performing at its best whilst protecting against the premature damage that shortens playing life and forces costly replacements.
FAQ
How long should I knock-in a new cricket bat?
Knock-in your cricket bat for a minimum of 6 hours, gradually increasing strike intensity across multiple sessions. Even factory-prepared bats benefit from additional knocking-in to ensure thorough preparation. Spread the process over several days to allow the wood to settle between sessions.
Can I use oils other than linseed oil?
Stick exclusively to raw linseed oil for cricket bat maintenance. Other oils like boiled linseed oil dry too quickly and cause surface cracking, whilst alternatives like vegetable oil can turn rancid or fail to penetrate properly. Raw linseed oil has the ideal absorption rate and protective properties for willow wood.
How often should I reapply oil during the season?
Apply light coats of raw linseed oil three times per season for optimal moisture balance. Apply 2-3 coats before first use, a single coat at mid-season, and another at season end. More frequent oiling risks over-saturation and dead wood, whilst less frequent application allows excessive drying.
Is it necessary to remove scuff sheets before use?
No, scuff sheets remain attached during play and actually protect your bat face from ball impact marks and surface damage. Quality scuff sheets are designed to stay in place throughout the season, only requiring replacement when they show significant wear or begin peeling at edges.
What are the signs my bat needs professional repair?
Seek professional repair if you notice cracks extending more than 10cm into the blade, significant edge splits affecting structural integrity, or handle loosening despite re-gripping attempts. Surface cracks under 5cm can often be managed with careful oiling and reduced use. Consult the cricket bat preparation FAQs for additional guidance on assessing damage severity.
Recommended
- Cricket Bat Care 2025: Maximising Bat Life and Power – Cricket Bats Com
- How to Prepare a New Cricket Bat: 20% Better Performance – Cricket Bats Com
- Cricket Bat Maintenance Explained: Boost Performance & Lifespan – Cricket Bats Com
- Cricket Bat Maintenance Tips: Boosting Bat Longevity – Cricket Bats Com